Section 1.1
Laser Safety
Lasers come in many shapes and sizes and likewise have various safety issues. The most common safety issue involves the potential for eye damage if a laser beam, a partial reflection of a laser beam, or even scattered light from something illuminated with a laser beam enters your eye. While your natural reflex to blink when bright light shines into your eye will help prevent damage from some very low power visible lasers, it isn’t enough to protect you from many lasers and isn’t helpful at all when working with light that is not in the visible spectrum. Near infrared light (from about 700 nm to 1.4μm) , in particular, poses a danger that because it is a long enough wavelength that you can’t see it and thus won’t know if it is going into your eye, but it is a short enough wavelength to be transmitted and focused by the lens in your eye (wavelengths beyond about 1.4μm tend to be absorbed by the cornea).
Because laser beams can be focused very tightly, the irradiance (power per unit area) of even a low-powered beam can be very high. These high irradiance beams make it is possible to burn skin or catch materials on fire.
Beyond the dangers from the light emitted by lasers, there are often other dangers associated with the laser as well. Gas lasers, including the Helium-Neon laser commonly used in student labs, use high voltage power supplies to pump the lasers. Dye lasers use chemical dyes that may be toxic, and many lasers are pumped by other lasers that may bring along their own safety issues. Know what type of laser you are using and what dangers it presents.
Every commercial laser has a sticker on it listing the safety classification of the laser. Depending on the age of the laser it may use the old system (Class I, II, etc) or the new system (Class 1, 2 etc). Regardless of which system is used, lasers that are class 3 (or class III) or higher pose a safety hazard that requires special care when working in the lab. Follow the best safety practices to mitigate this danger when working with these lasers, but even when working with class 1 or 2 lasers, it is important to follow these practices, so that they become habitual.

Section 1.2
Best Safety Practices
While it is important to understand any specific safety issues with the laser you are using, using these best practices every time you work with any laser will help keep you and your colleagues safe:
Let it be known when the laser is on
You might know whether the laser on your table is on or not, and if it is dangerous or not, but the next person to walk in the door may not. Post a sign on the door. You can buy pre-made
Gallery 1.1 Laser Safety Signs
signs, or print them out yourself (use an interlock to disable the laser when the door is opened if your laser poses a severe hazard) and tell people when they enter the room that a laser is in use. Make sure anyone in or entering the room is familiar with basic laser safety procedures, and is aware of any specific safety issues related to your laser, such as the need to wear protective eyewear. When you go to turn the laser on or off, announce it so that others in the lab know.

Remove reflective jewelry
Take off any rings, watches, bracelets, necklaces or other reflective jewelry. When working with the optics experiment it is easy for light to reflect off of the surface of one of these objects and go somewhere unexpected - like into your eye.

Terminate all beams
When the beam exits the laser, make sure that any path that it can take is properly terminated - i.e. ends in a beam dump. This includes the direct path of the laser as well as any secondary paths that the light may take if it is reflected by a beamsplitter, window or other partially reflective optics. The laser should typically not propagate beyond the edge of the optics table, because people will be walking around the table and usually won’t expect there to be a beam present. As long as the laser power is low (below about 5 mW) and the beam is not focused, you can block the beam using a dark matte surface, such as a piece of black paper. For higher power or more tightly focused beams it is better to use a metallic beam block to avoid a fire hazard. A short piece of copper tube that is pinched closed at one end and bent into a semi circle pointing down makes an excellent beam block - light entering the open end of the tube must reflect several times off of the absorbing metal if it is to scatter back out of the tube.

Keep the beam in the horizontal plane
Most optics experiments are built on an optical table with the beam traveling in a horizontal plane a few inches above the table. Unless there is a specific need to deviate from this geometry for your experiment, keep the beams horizontal. Avoid using periscopes that reflect the beam upwards, or mirrors tilted such that beams are rising off the table. By keeping the beams confined to a horizontal plane you make it easier for users to stay safe by keeping there eyes out of the plane of the beams.

Keep your eyes up
Because the laser beam is usually confined to a plane a few inches above the optical table-top, it is important to avoid having your eyes pass through this plane. Typically this isn’t an issue when standing, but avoid the temptation to lower your head to the table level to eyeball the alignment of any optics, or for any other reason. Also avoid bending down (i.e. to tie your shoe or to pick up a fallen object) when the laser is on, and make sure that any desks or workstations that you might use near the optics table aren’t setup with the user’s eye level at the height of the laser beams. If you need to lower your head for any reason, turn the laser off first.
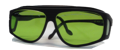
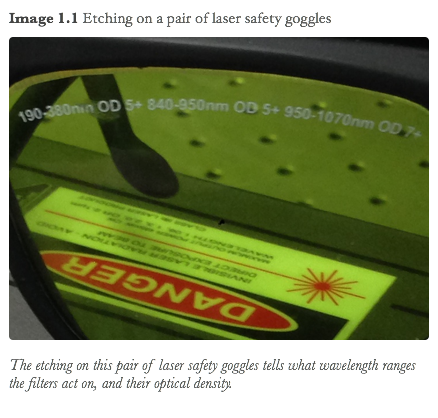
Wear safety goggles
Laser safety goggles are available that block light at very specific wavelengths. When working with class 3 or higher lasers it is necessary to wear safety goggles that protect at the laser wavelengths. Keep in mind that some lasers may have more than a single wavelength that you need protection from. For instance if you are working with an open diode-pumped solid state laser you will need protection at the laser output wavelength as well as at the wavelength of the laser diode pump. While there are safety goggles that simultaneously block many of the common laser wavelengths, you might choose to use goggles that only block out the relevant wavelengths for your laser, as these tend to let in more useful light than the all-purpose goggles which can make everything pretty dark. The wavelength range at which the filters attenuate is typically etched on the lenses, as is the optical density of the filter.
Section 1.3
Turning On Your Laser
The mechanism for turning on your laser depends on the type of laser you are using and the specific model, however, commercial lasers typically have a short (3 second is typical) time delay between when the on button is pressed (or key is turned) and when the laser actually begins emitting radiation. This is an intentional safety feature however in practice it often introduces a significant hazard as a novice user wonder’s why nothing is coming out of the laser immediately after turning it on and is tempted to look into the laser to troubleshoot it. Don’t do this. Although many lasers do have a shutter that can be open and closed at the output of the laser head, you don’t need to look into the laser to see if it is present, and you should never look directly into the laser, even if it isn’t producing output. Place a card at the output of the laser and wait for several seconds to see a spot appear on the card. If you still don’t see any evidence that the laser is working, turn it off to troubleshoot or consult the manual.
Gallery 1.2 Type of power supplies used in common lasers
Section 1.4
Handling Optics
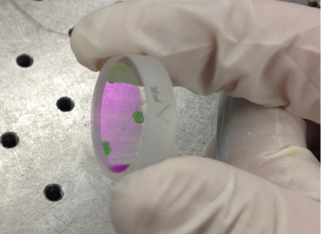
Small smudges or scratches on a laser optic can produce unwanted diffraction patterns that are problematic in optics experiments. Since laser optics are expensive, and a single speck of dust or fingerprint can render them useless, it is important to handle them with care to keep them clean.
Minimize the amount you handle bare optics. Wear latex or nitrile gloves when you do. Don’t place the optics horizontally (since that increases their exposure to vertically falling dust), and avoid standing over optics (as you are a source of dust that can fall onto the optic). When you are done with an optic return it to its original packaging so that it can be easily identified. Cover optical tables when not in use with plastic flaps, and/or cover the mounted optics with plastic bags (sandwich bags work well).
Some optics will have information about the optic written on the barrel of the optic along with an arrow or caret mark indicating which surface is being described - for example the mirror pictured below is labeled “PR” with a caret indicating the face on the left is “partially reflecting”. This information should be written in pencil only - ink from pens or markers is soluble in the solvents that are used to clean optics, and will rub off and contaminate the optical surface if the optic is cleaned.
Remember it is a lot easier to keep an optic pristine than it is to restore it to that state or to replace it
Section 1.5
Cleaning Optics
While it is best to keep optics from getting dirty in the first place, it is sometimes necessary to clean an optic of dust or oily smudges such as fingerprints.
While it is rarely possible to clean an optic back to its original pristine state, a few minutes of work can resurrect an optic and make it useable again for most purposes.
Dust can be blown off using a can of clean compressed air. Make sure to test the nozzle before blowing on the optic - as some cans will dispense liquid propellent along with the air that can damage the optic. Hold the can several inches away from the optic and try blowing off the dust with a few quick bursts of air.
To clean fingerprints and oily smudges off of a dielectric coating, such as those found on many laser optics, hold the optic horizontally while wearing rubber gloves, and place a piece of lens cleaning paper on it (this is a form of lint free tissue paper). Put a single drop of spectroscopic grade methanol on the paper using an eye dropper. Then drag the lens paper horizontally pulling the liquid off the surface. Don’t scrub! You may find it necessary to repeat this procedure with a fresh piece of lens paper. If this doesn’t work you can find more techniques described online and shown here.
Video 1.1 Cleaning Optics
The “drop and drag” method of cleaning dielectric coated optics